Batch API
Batching API calls increases efficiency to only need to open a single connection, do the entire series of job calls, and receive the results back together. This is particularly helpful for large sets of jobs which may take increase processing time. These batch calls are processed in a First In, First Out (FIFO) order.
The Batch call is divided into submission calls and post submission calls. The Submission calls should be done in precisely this order to build the overall process.
Calls within Submission Action:
- Creating a Batch
- Upload PDF
- Build XML
- Submit
Post Submission Actions:
- Check status
- Check on jobs details
- Retrieve tracking information
Importing Collection Reference
This article pre-supposes you have set up the workspace and connections from Setting up Click2Mail's Postman Collection. The BatchAPI Collection is included in the main.zip file.
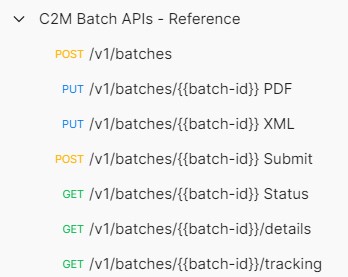
You should see the C2M Batch APIs collection under My Workspace on the left. If you expand the collection, you'll see all of the endpoint examples:

Building and Submitting a Batch
The calls for creating and submitting a batch must be done in this exact order of creating the batch, uploading the PDF, associating the XML, and submitting.
Step 1: Create an empty batch in order to get an ID to be the container for gathering and tracking purposes.
Make a POST request to /batches endpoint. There are no required parameters.
A successful call should return an HTTP 201 status and the XML similar to the following which contains the ID to use in subsequent sections.
<?xml version="1.0" encoding="UTF-8" standalone="yes"?>
<batchjob>
    <createdAt>2022-04-18T10:52:30-04:00</createdAt>
    <errorMessage></errorMessage>
    <hasErrors>false</hasErrors>
    <id>91777</id>
    <received>false</received>
    <submitted>false</submitted>
</batchjob>
Step 2: Upload a document that will be used for the job. Make a PUT request to /batches/{batchID} endpoint with content type of PDF to create a single record with the PDF. A successful call will return a status 200 but will not return any XML.
In the example collection this will be the batchTest.pdf provided in the main.zip. Using Postman, in the Body section you may need to remove and re-associate the pdf.
When programmatically associating the pdf, include the source in the body of the call.
Troubleshooting: If you receive a 400 (Bad Request) error , check that you have properly associated the pdf in the body.
Step 3: Upload the XML of the entirety of the batch. Make a PUT request to /batches/{batchID} endpoint with content type of XML to create a single record with the XML. A successful call will return a status 200 but will not return any XML.
The XML should follow the format of where you create a batch container full of jobs following the standard job format.
<?xml version="1.0" encoding="UTF-8"?>
 <batch xmlns:xsi="http://www.w3.org/2001/XMLSchema-instance">
   <filename>batchTest.pdf</filename>
   <appSignature>PostmanC2MTests</appSignature>
   <job>
-- use standard job XML
  </job>
  <job>
--As many jobs as desired
  </job>
 </batch>
In the example collection this will be the batchTest.xml provided in the main.zip. Using Postman, in the Body section you may need to remove and re-associate the pdf.
When programmatically associating the pdf, include the source in the body of the call.
Troubleshooting: If you receive a 400 (Bad Request) error , check that you have properly associated the pdf in the body.
Step 4: Submit the batch which will queue it up to run through the jobs. Make a POST request to /batches/{batchID} endpoint. A successful call will return a status 200 but will not return any XML.
Checking on Batch Status and Tracking
Step 1: Checking overall status of the batch by doing a GET to the /batches/{batchID} endpoint. This will return an XML such as the following
<?xml version="1.0" encoding="UTF-8" standalone="yes"?>
<batchjob>
    <createdAt>2022-04-22T11:46:24-04:00</createdAt>
    <errorMessage></errorMessage>
    <hasErrors>false</hasErrors>
    <id>91802</id>
    <received>true</received>
    <submitted>true</submitted>
</batchjob>
Submitted boolean indicates whether the batch has been sent to the servers.
Received boolean indicates whether the server has started working on the batch job. By inspecting the number of pieces in the status call you can determine how far it has been processed.
If the status is Submitted=true, received =false that indicates that the batch is currently sitting in the queue and will be processed in the order in which it arrived.
Step 2: To get the list of job ids created, call the GET /batches/{batchID}/details call. If there are a large number of jobs within the call you can use the counter of jobs returned to cross check if all jobs were processed or are still running.
Step 3: Optionally if you would like to retrieve the tracking information you can call the GET /batches/{batchID}/tracking call.
If there is tracking information available it will appear the same as the standard tracking XML call return.
If the tracking has not been provided, it will return an XML with "Tracking data not available for this batch."
Note In the staging environment the API will never return tracking details as the items are never actually sent.
Important The tracking information is only provided back to Click2Mail once per day so calling it once per day is sufficient to get the most up to date information.
Updated 9 months ago
